Cutting Mat Board Yourself
Scroll down to see a short video on how to do it!!!
|
Cutting mat board yourself can save you a lot of money. You don't have to buy an expensive mat cutting system though. First, try your hand with a basic handheld, freestyle mat cutter. You can get started immediately for around $20. Click on pic for details. |
 |
So, get your mat board cutter, get your ruler and let's cut some picture frame mats...
Cutting mat board - the 1st cut is the deepest....
First things first – whenever you're cutting mat board by hand make sure you have a foam board or a self-healing cutting mat below the mat you're cutting.
Don't be in so much of a rush to save money that you end up having to buy a new table because you ruined one while cutting your mats!
Okay, now that that's clear, from a full sheet of mat board measure out and mark an 11 x 14" mat. Using your straight edge and straight blade, cut the mat from the sheet.
Find out how to get the most mats out of a mat board - check out cutting mat board efficiently.
Now we're ready to cut the opening. Let's say we're cutting an opening for an 8.5 x 11" document. If we cut the opening that size the document will fall through. So, the rule of thumb, at least my thumb anyway, is to leave 1/4" lip on each side for the document to rest on.
This means 1/2" less, total, in the width and height of the opening. So, our window would actually be 8 x 10 1/2".
To center it in the mat subtract the height of the opening from the actual height of the mat (11-8 = 3) Divide that by 2 (3/2 = 1 1/2) So, your top and bottom borders are 1 1/2".
Repeat for the left and right borders and you get a border of 1 3/4" on each side (14-10.5 = 3 1/2) (3.5/2 = 1 3/4)
 |
Before you begin actually cutting mat board, take a moment to remind yourself to go slow and really focus on what you're doing. Rushing will only waste time and money. Line your straight edge or ruler up with your first cut line, make sure it is as straight as possible then press down firmly, you don't want it to move at all once you begin making your cuts. For a neat clean mat, make sure you start the cuts right in the corners where the cut lines cross each other. |
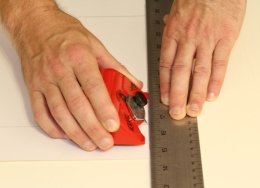
Line up the beveled mat cutter so that the back is up against straight edge and the front of the cutter is angled up (as shown). From this position, slowly lower the point of the blade directly into the corner, until the front edge of the cutter is up against the straight edge.
Keeping a firm hold on the straight edge slowly pull the mat cutter toward you until the indicator line on the cutter meets the cut line drawn on the mat board. Slowly tilt the front of the cutter up and remove from the mat.
Repeat this process on the 3 remaining cut-lines. Once all four lines are cut, the center piece or cut off will fall out.
Tip: slightly over cut each line so the cut off falls away freely from the mat board. If you don't completely cut through each line the cut off will end up hanging from one of the corners. Compare the mat on right where the corner was damaged versus a perfect cut on the left. Both cut with a handheld mat cutter.
 |
 |
Lefties: When cutting mat board with a beveled cuter the bevel is angled from outside to inside of the mat which means, as a left-hander, you'll have a difficult time trying to hold the straight edge and pull the mat cutter toward you.
The simple solution is to walk around to the other side of the table hold the straight edge down with your right hand and push the mat cutter away from you instead.
That's all there is to cutting mat board with a handheld cutter!
Remember the three P's of using a handheld mat cutter and you will be successful:
Patience, Patience, Patience
Ready to step up to your first mat cutting system?
Click here to learn the trick to cutting double mats.
Leave any questions, thoughts, tips or suggestions below!
© Copyright 2012 -2022 by Al Pilato, picture-frame-it-yourself.com
Privacy Policy Disclaimers
Updated November 18, 2022
Have a question or a comment? This space is for you! Leave it in the box below.